Kit Browser
On this page
The Kit Browser is Romper’s main view. It shows all your kits in a visual grid organized by bank, letting you quickly find, filter, and manage your sample library.

Navigating Banks
Kits are organized into 26 banks, labeled A through Z, matching the Rample’s hardware layout. Each bank can hold up to 100 kit slots (00 through 99).
The bank navigation bar runs along the left side of the kit grid. Click any letter to jump to that bank, or use the A through Z keys on your keyboard for instant navigation.

Banks that contain kits are displayed with their full name (e.g., “Bank A ALWIS”). Empty banks are skipped in the grid view.
Editing Bank Names
Each bank header shows a pencil icon that lets you edit the bank’s artist name inline. Click the pencil (or click the existing name) to enter edit mode, type the new name, and press Enter to save or Escape to cancel. Clearing the name removes it entirely.
Bank names are stored in the database and written as RTF label files (A - Artist Name.rtf) to your local store. When you sync to an SD card, these RTF files are also written to the card root so the Rample hardware displays the correct artist names.
Kit Cards
Each kit appears as a card in the grid showing:
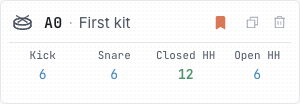
- Kit ID – The bank letter and slot number (e.g.,
A0,B3) - Kit name – Either a custom alias or the name from the Rample’s label file
- Voice sample counts – Four colored indicators showing how many samples are loaded in each voice
- Empty (red/orange) – No samples assigned
- Partial (light green) – Some sample slots filled
- Full (bold green) – All sample slots populated
- Voice names – Automatically detected labels like “Kick”, “Snare”, “HiHat” based on sample filenames
- Kit type icon – Drum, Loop, Vocal, FX, or Synth, inferred from the voice contents
- Stereo icon – Appears if any voice in the kit contains stereo-linked samples
- Status badges – Shows if a kit is Editable, Unsaved, or locked
- Favorite bookmark – Click to bookmark frequently used kits
Click any kit card to open it in the Kit Editor view.
Creating Kits
Click the New Kit button in the header bar to create a blank kit. You’ll choose a bank and slot for it. The new kit appears in the browser ready for editing.
You can also click one of the Add Kit cards that appear at the end of each bank’s kit list. These let you add a new kit directly into a specific bank.
Duplicating Kits
To copy an existing kit to a different slot:
- Open the kit in the Kit Details view
- Use the Duplicate Kit option
- Choose the target bank and slot
All voice assignments and settings are copied to the new location.
Filtering and Search
The header bar provides several ways to narrow down the kit grid:
Search
Type in the search field to filter kits. The grid updates in real time as you type (minimum 2 characters). Search is case-insensitive and matches partial text across multiple fields:
- Kit name – The primary kit name
- Kit alias – Custom short names you’ve assigned to kits
- Bank artist – The artist field associated with a bank
- Voice names – Custom or auto-detected names for each voice (e.g., “Kick”, “Snare”)
- Sample filenames – The filenames of samples assigned to any voice in the kit
- “Stereo” – Typing “stereo” will match any kit that has stereo-linked voices
When a search matches on sample filenames, kit cards update to highlight the matching sample names within each voice, making it easy to spot exactly which samples matched your query.
Favorites Filter
Click the Favorites toggle (bookmark icon with count) to show only kits you’ve bookmarked. This is useful when you have hundreds of kits but regularly work with a small set.
Modified Filter
Click the Modified toggle to show only kits with unsaved changes. This helps you keep track of what needs to be synced to your SD card.
Kit Status Indicators
Kits can be in several states:
- Editable – The kit can be modified. Voice assignments and metadata can be changed.
- Unsaved – The kit has changes that haven’t been synced to the SD card yet.
- Locked – The kit is protected from accidental edits. Click the lock icon to toggle this.
Validating Your Store
Click the Validate Store button in the header to run a check across all kits. This verifies:
- All referenced sample files still exist on disk
- File formats are compatible with the Rample
- Kit structure matches the expected layout
- No duplicate samples within a voice
Validation results appear in a dialog with warnings and errors you can act on.
Scanning Your Library
Use File > Scan All (Cmd+Shift+S / Ctrl+Shift+S) to rescan your entire library. This runs a bank scan (reads RTF label files for bank artist metadata) followed by a kit scan (analyzes sample filenames for voice names and extracts WAV metadata). Banks are also scanned automatically at startup.
To scan a single kit, open it in the Kit Editor and click Scan Kit or press /.
Keyboard Navigation
The Kit Browser is fully keyboard-navigable:
| Action | Shortcut |
|---|---|
| Jump to bank | A through Z |
| Move between kits | Arrow keys |
| Open selected kit | Enter |
For the complete shortcut list, see Keyboard Shortcuts.